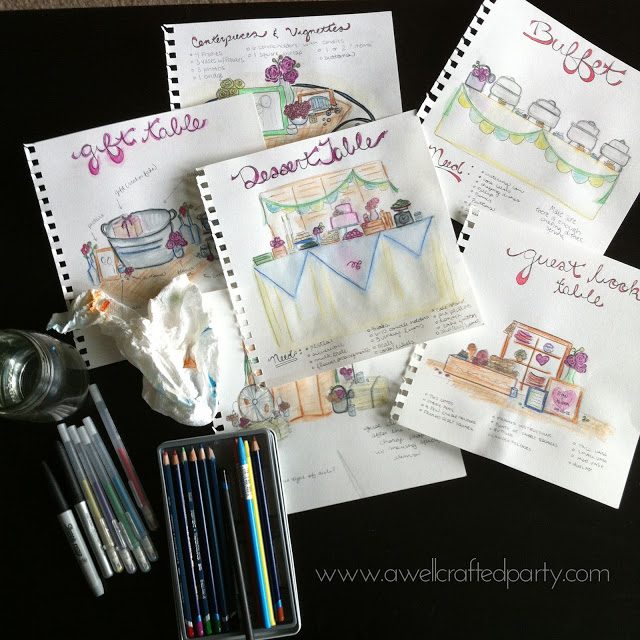
In August of 2012 I was fortunate enough to get to help my friends Alishia and Ryan with their beautiful wedding. I posted a few sneak peek photos from my camera a while back. I’m excited to finally be able to share some of the wedding photos (from the photographer) and the process behind the event! Check back tomorrow for the full {real party} post— today I want to focus on the process of before and after. I hope that if you are planning a DIY wedding some of these tips can help you with the process.
My friend Alishia came over one day in the midst of her planning and said she needed a little help figuring out what to do for her tables and such. She actually had SO much already done that I only needed to help her visualize how her different elements would come together for the big day.
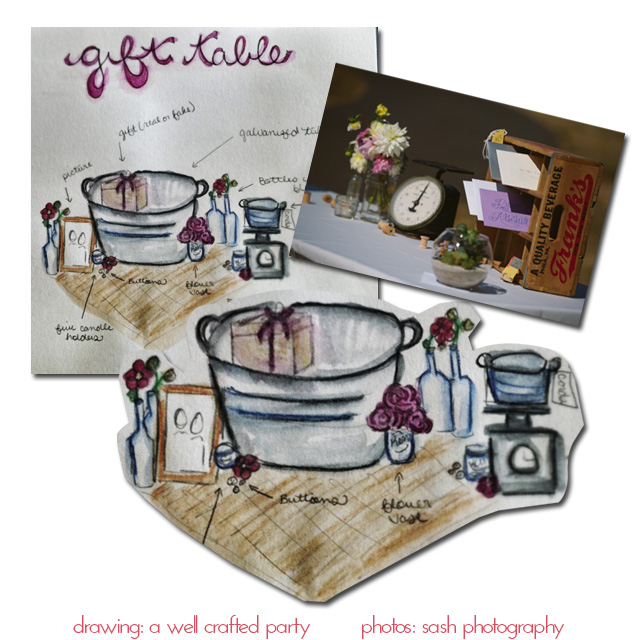
First she told me a lof the the elements she had been procuring for the big day. She had picture frames, buttons, burlap, handmade fabric napkins, mixed borrowed plates, a variety of vases, you-pick flowers, a variety of candle holders, and jars for glassware, hay bales, and some other items… After she described the items that she had and some of her hopes for the event we made a plan. I then took the ideas and drew them out so that she could visualize the main areas of the event space. Enough talk… below are the drawings I made and how they turned out at the event!
All of the drawings are done by me and the images are from the wedding photographer, Sash Photography. More photos from the event coming tomorrow!
DIY Wedding Decoration Planning Tips:
- Gather the items that you plan on having in your wedding (even if it is just a list of items)
- Sketch out ideas for the major event areas you are decorating. Areas that are typically in weddings include gift tables, alter, aisle, dinner/cafe tables, bar, cake table and seating areas.
- LABEL everything. I put labels on my drawings as well as any boxes that are used for the event.
- As your wedding approaches gather your materials in boxes labeled for each area. This helps a TON when pulling out your decor items for the event. Rental items can be added when you pick them up…. the label on your box will help guide you to which rental items to include in the box.
- Plan on things not being perfect. Things may or may not end up looking exactly as you had sketched or planned. In the case of the above wedding the dessert area looked entirely different as it was placed in a gazebo on a beautiful dresser…. it ended up being much more amazing than we could have planned on paper!
Wedding Vendors:
Photography: Sash Photography
Venue: Victorian Acres (Unfortunately, no longer a venue)
Decor Rentals: Something Borrowed and Barbur Rentals
Food: Sawsadee Thai Food Cart
Favors: (1) coffee: Courier Coffee Roasters (2) caramels: Sweet and Salty Caramels
Beer: Lompoc Brewing
Dress: Xtabay Vintage Clothing
Flowers: Swan Island Dahlias
Event Styling: Bride, Bridesmaids, and A Well Crafted Party


5 Comments
I used swan island dahlias for my wedding, loved them!
The flowers were GORGEOUS. I’d suggest this route to any one who wants fresh, easy going bouquets. They were just beautiful and fairly quick to put together!
Your drawings are so pretty! If I were a client-bride of yours, I would love to have them as lovely wedding keepsakes (do you allow this?).
Awww! Thank you. 🙂 Yes, this bride got to keep her drawings. In most cases I do full sketches with my water colors and/or pens. However, sometimes I make mood boards on my computer. If I do a sketch and I feel like it might end up a keepsake I give it. I do hope she keeps one or two of them to put with her wedding photos someday.
wow its really nice
i love it
thanks for sharing
Giftcakecard recently posted…How to make a Delicious Cake Without Baking Powder