Category

Party DIYs

Category

Ahhh… the First Birthday. Such a weird age to throw a party for! You get the food done and the decor done and then it is like…
What is everyone going to DO?
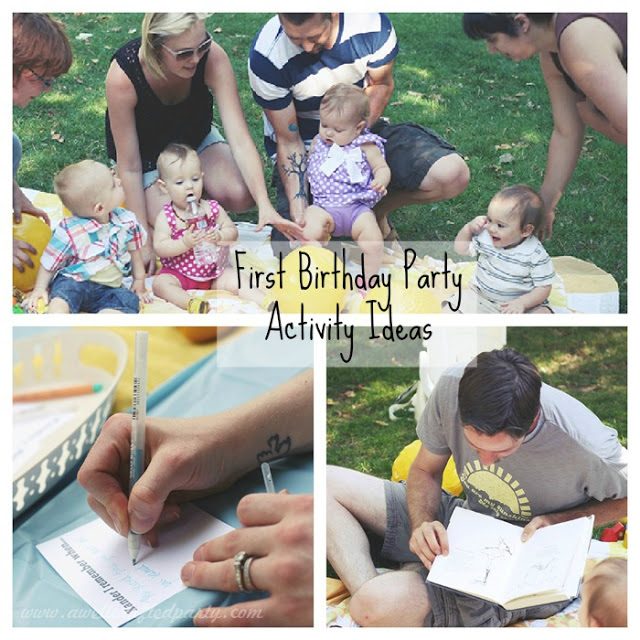
Often a first birthday will have an array of different ages of people. Our first birthday had about 20 adults, a teenager, a 9 year old, and 5 babies! I was completely stumped for a long while trying to figure out some fun activities for everyone. Mostly everyone chatted, played with the babies, and took a lot of photos. (Common… 5 babies together, not crying, is probably one of the cutest things EVER.)

Here is what we came up with for our particular spread of people….

For the adults—

  • We had lots of food and beverages. Some of those beverages were adult-only type beverages. It made the whole party go smoother in my opinion.
  • Instagram/ Twitter Hastag Fun— I planned this one, but then forgot to put out the sign with the hashtag or use it myself. But, Adi’s Where the Wild Things Are party did a GREAT job with this idea!
  • “I Remember When” and “Advice for your Birthday” slips for people to write memories or advice for the birthday boy. (Look for a free printable next week!)


For the Babies— 

We wanted happy and comfortable babies for the event. So, we wanted to provide shade, food, and toys. I don’t recall any of the five kiddos having a melt-down!
  • TOYS! Put out some baby friendly toys for the kiddos. We put out several of X’s stuffed animals, cars, and wooden toys. The main event though were the yellow beach balls!
  • Do a baby time with a story and some songs. If you have ever brought your kiddo to “Mommy & Me” groups, Gymboree classes, or Book Baby programs at the library then you know what I’m talking about. Pick out a few fun books to read (in excited voices with lots of movement). Break up the story time with songs that have movements. Of course, we had to sing “You Are My Sunshine!”
Books that would be great to read at a You Are My Sunshine First Birthday:
Songs to Sing:
 
You are my Sunshine, My only Sunshine
You make me Happy, When Skies are Grey
You’ll Never Know Dear
How Much I Love You,
I Love You More, and More
Everyday!

* Photos by Motormouth Studio
** Some of the above links are affiliate links. Affiliate links help support the bloggers that post them. I do not link items I have not used and/or do not like. For more information on my Advertising Policies click HERE.

 
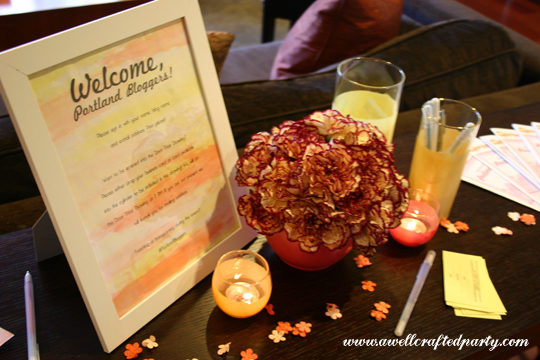
One of my favorite parts of the recent Portland Blogger meet-up was creating some of the pretty spring decorations for the event. I wanted to bring in some of my favorite spring/summer hues without breaking the bank. So, a few cans of spray paint later and I had fun decor items that could serve multiple purposes. You can customize the look to fit ANY party by just changing the color! 
 Supplies:
Glass vases and/or candle holders
Alcohol to remove stickers
Painter’s tape
Primer Spray Paint
Spray Paint in your choice of color
Spray Sealant
 
Step One: Take off the stickers (if there are any) from your vessel.
 I took of the stickers by rubbing them with rubbing alcohol. 
After the alcohol sat on the sticker for a few moments the sticker pulled right off.
Remember to clean the and dry the vessel after using the alcohol.
Step Two: I really wanted the top of the vases and candle holders to be left unpainted. So, I ran painters tape along the tops of the vessels. I varied the width of the tape for my project.
Step Three: In a well-ventilated and protected area spray the vessels with a primer coat. Let dry for time specified on the back of the spray paint can.
Step Four: Spray the vessels with a coat of color. Let dry for time specified on the back of the spray paint can. Give the vessels a second coat if needed.


Step Five: Spray the vessels with a coat of sealant to keep the paint from scratching.
Step Six: Remove tape! 

photo via Vintage Pretty
The vessels made great vases for the fresh flower arrangements. They also held pens and forks throughout the party. And, best of all, they made beautiful candle holders. 
They really gave a beautiful glow! 
I’d love to know if you attempt this DIY and would really love to see photos of the finished product!
 
If you are a fan of the Love in Blossom photoshoot that I featured a while back…
 (and that was featured on Hostess with the Mostess)
then you were possibly waiting for these DIY posts!
**By the way, if you use any of these DIY projects I’d LOVE to see pictures!**
Well…with no further hullabaloo…
 ~*~
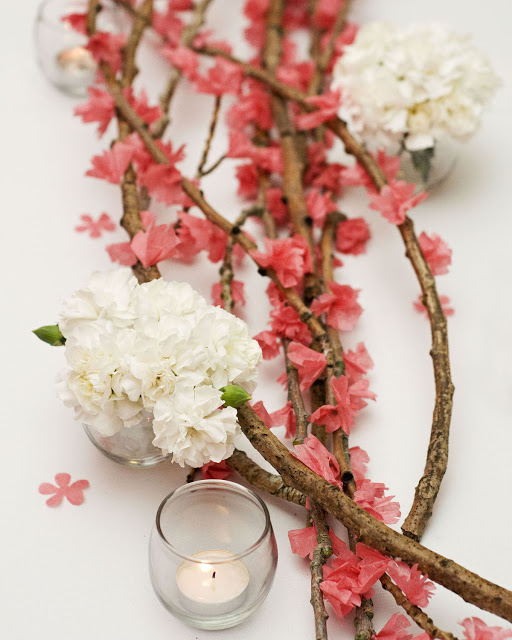
DIY Cherry Blossom Branches
 Cherry Blossom BranchesSupplies:
Branches
Pink Tissue Paper cut into 1 inch squares
Pen or Pencil
Hot Glue

Step One:
The project works best if the tissue paper is cut several sheets of paper at a time and not as a single sheet— 5 layers of tissue paper work best. 

 
Fold tissue paper squares on the diagonal. And then fold again similar to making a paper snowflake. 
Round the straight side of the now triangle piece of tissue paper. 
Put a notch in the center of the of rounded edge. 
 Step Two:


Separate the tissue layers and twist around the end of a pen or pencil.
Step Three:

Placing a dab of hot glue on the branch attach the tissue paper to the branch using the pen or pencil.

 Continue placing the tissue paper on the branches twisting the blossoms around the branch.

Notes:
Branches can be purchased on-line or found in your own backyard. 
***There are similar projects featured on both the Martha Stewart and Good House Keeping websites. I certainly wasn’t the first person to think of this, but I do like how my project turned out.**Sources:
Blossom Tissue Paper: from www.paper-source.com

BIG THANK YOU

to Hostess With the Mostess for featuring this DIY
and to Capturing Grace Photography for taking such beautiful photos!