Today’s {Real Party} Feature is from our frequent Guest Blogger, Jill!
Enjoy!
~*~
How do you celebrate with a two year old? Everyone’s favorite – Elmo! Or as both of my children call him, Melmo. My daughter is now four, so bear with me. These are some old photos from “the ancient days before blogging.” I don’t have a step by step picture, but I do have a memory like a steel colander.

We rented a local community room, as our families have grown quicker than our home. Our local t-shirt store had the perfect shirt, thank goodness! The Dollar Tree (our everything’s a dollar) store is a great resource for cheap party supplies. That particular year, they had a package of Elmo face die cuts. I bought several packages, and used masking tape to add them around the room.
For a game, we had a “Pin the Nose on the Elmo.” This particular one is store bought. You can easily find coloring sheets of Elmo online. Open or save the coloring sheet into your favorite word processing program. Usually, you can find a template to print it as a poster. I recently did this using Microsoft’s Publisher program. If you want to “blow up” the coloring sheet to a larger size, use the program’s template for creating a poster. Then, pieces of the coloring sheet will print out, like a giant puzzle. For an easy route, plop your birthday girl or boy into the high chair. Use masking tape to affix the paper to the tray, pass over a red crayon and voila! Bigger Elmo, happy kid, and you can finally go to the bathroom in peace. Orange sticky back felt cut into circles would make perfect noses to pin on Elmo – no pins! Mason Jars make great templates for circles, and great mommy cocktail holders for when you’re up into the wee hours crafting!
Let’s face it, Elmo’s cute, but no one likes red icing. A local baker whipped this up, then put an Elmo themed toy as the cake topper.

Each table had photos of my daughter over the previous year. Cheap photo frames, again from the Dollar Tree, served as centerpieces for each table. There was a red Elmo balloon attached to a purple balloon weight (also available at Dollar Tree), and the balloons were flanked by the picture frames.The local party store also had red boxes with Elmo’s face on them. We used those, filled with sweets and toys.
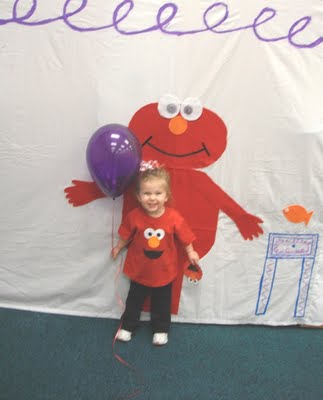
Even with all this, the party really needed a stand out piece. I made an Elmo’s World back drop for a photo “booth.” All the kids loved it, and my daughter kept trying to hug Elmo. Here’s what it looked like:
Read on for instructions on how to make your own Elmo’s World Backdrop!
And here’s what you’ll need:
1 twin sized sheet or large section of material (Walmart’s twin sheets were cheaper than the material by the yard)
Print out of Elmo’s world
Template for a fish/favorite coloring page
Purple craft paint
Blue craft paint
White or glitter puffy paint
1 sheet orange felt
approx 10 sheets red felt (I used nine, but got 10 “just in case”)
1 sheet white felt
Sharpie
thin square sponge paint brush
Ailleen’s craft glue or hot glue gun
newspaper or tile floor
WAIT UNTIL YOUR CHILD IS GOOD AND ASLEEP, OR HIRE A SITTER.
Lay out sheet or large portion of material on hard surface. (lay newsprint underneath if you prefer.) Using purple craft paint, swirl a design along the top of the material/sheet. I used my print out of Elmo’s world as a guide, but I ran out of room to do many swirls at the top like Elmo really has.
Then using blue paint, draw the table, piano, whichever elements you choose to include. Use the purple to make scribbles in the outline of your details. Let dry.
* NOTE: I did this on the tile floor without laying down newspaper. I panicked when the purple paint bled through, but dish soap and water took it right up.
Now that you have the basics, it’s time to jazz it up. I started with Elmo.
Trace your hands onto one piece of red felt, cut out. Cut one piece red felt into two equal pieces, use as arms. OR if you want longer arms, do 4 equal pieces, etc. I used 1 red piece cut into two longer pieces for Elmo’s legs. (cutting down the middle of the longer side).
Take 4 pieces of red felt. Stack two pieces, and cut a rounded edge. (I used my pizza stone as a guide). Then do the same for the other two pieces. Now you’ll have a giant circular shape for Elmo’s body. Attach using glue to the material.
At this point, you can add the arms, legs and hands.
Then take two more sheets of red felt. Using another round object as a guide, lay them together and cut a circular shape. Then attach as the head.
Use the white piece to make two circles. From this, you’ll get the eyes. I used the sharpie to make the little black dots in his eyes.
Also from the white piece, cut a small circle to serve as Dorothy the Goldfish’s eye. I also used a sharpie on her eye.
Using the coloring sheet as a template, cut Dorothy from the orange felt. Use the remaining orange felt to cut a large circle for Elmo’s nose.
At this point, attach the remaining pieces using the glue. I just popped the felt goldfish on above the table and let her “float” there for a bit.
Then take the white/silver puffy paint and draw a circular shape around the fish. Leave the top open, and draw a straight line across to make the goldfish bowl. I added some extra paint at the bottom of the bowl to look like gravel. Some sequins would be perfect there! And if you use the craft glue, you can glob on a bunch and add sequins like you would add sprinkles to a cake.
Let dry overnight if possible. I hung it using some serious amounts of masking tape.
I wanted so badly to find a cd of Elmo/Sesame Street song, but didn’t. Now, hopefully, you could find something on iTunes, etc.
But most of all, remember that Elmo loves you very much!
~*~
Thank you Jill for sharing your party with us!


